
Setting up a Remote Development Environment with OpenSSH Server
(sshd or daemon for you Linux Folks)
COVID has revolutionized the way we think about work. Setting up a remote development environment is suddenly high on your list. While the sudden uptick in remote work is new, the tools necessary to setup a secure remote workflow have been getting easier and more powerful over the years. Now, there are many free tools available that will free your developers to work as they wish and Microsoft playing along with features in Windows and new IDE tools.
Gone are the days of clunky terminals and inelegant RDP. Visual Studio Code’s new remote code extensions and reliable old SSH allows the big three operating systems to play nicely together over a secure tunnel. The result can a blended environment where not even a single line of code needs to live on your local machine, regardless if you prefer Mac, Windows or Linux.
If you have a project that prohibits running things locally, you can setup a powerful stack. Using the power of SSH’s tunneling and key sharing, you’ll have a remote development environment with single sign on and only one key to worry about. The beauty of this setup is that you can run it on any server running SSH. We’re demonstrating a mix of Mac, Linux and Windows to highlight the portability of this setup and some of the hurdles that you might encounter. As long as your server can run SSH, you can use this setup. Windows Open SSH Server doesn’t support everything, but it’s very usable.
In this three part series, we’ll show you the ins and outs of setting up a remote development environment, and point out some caveats and gotchas along the way. We will walk you through the steps necessary to get things running from a local machine, connecting to a development server and access a git repository – all without a line of code running on the developer machine. Add in SSH’s local proxy, and you can access server resources without running them locally or even worrying about ports. Windows-based development servers don’t get key sharing because of a limitation in SSH, but there is a slightly inelegant workaround for that too.
Setting up your Server
By the end of this guide, you will have a fully configured Windows Server 2019 instance running an SSH Daemon through Windows or WSL Ubuntu. In part two of this series we walk through the setup of pre-shared keys for password-less login, and in part three you will learn how to connect VS Code to the server, code like you were sitting at the machine, and interact with the repository.
This guide assumes you know how to:
- Create EC2 Instances on AWS
- Administer Windows 2019
- Basic Ubuntu terminal knowledge
To show how we can have Mac, Windows and Linux playing nicely together. We’ll be using:
- A Windows 2019 Server running WSL (Windows Subsystem for Linux) and the Ubuntu Terminal environment running on an AWS free tier EC2 instance (Development Server)
- VS Code on Mac with the Remote Development and SSH extension (Local machine)
- A Git Repository
Create and start your new Free AWS Instance
VSCode’s remote development tools provide SSH access along with Containers and WSL access. While we can run it on a Linux server directly, folks using IIS and other Windows software are no longer out in the cold. We’ll demonstrate setting up a Windows server from the ground up to show how easy it is to get to work. We’ll be using RDP to configure the server, but it won’t be necessary by the time we’re done.
From your AWS console, set up your development server:
- Create a default instance in the free tier running Windows Server 2019 using the official AWS AMIs.
- Attach a security group to the EC2 instance that allows communication over RDP (TCP 3389) and SSH (TCP 22)
- Select a key pair you have access to so you can retrieve the administrator password.
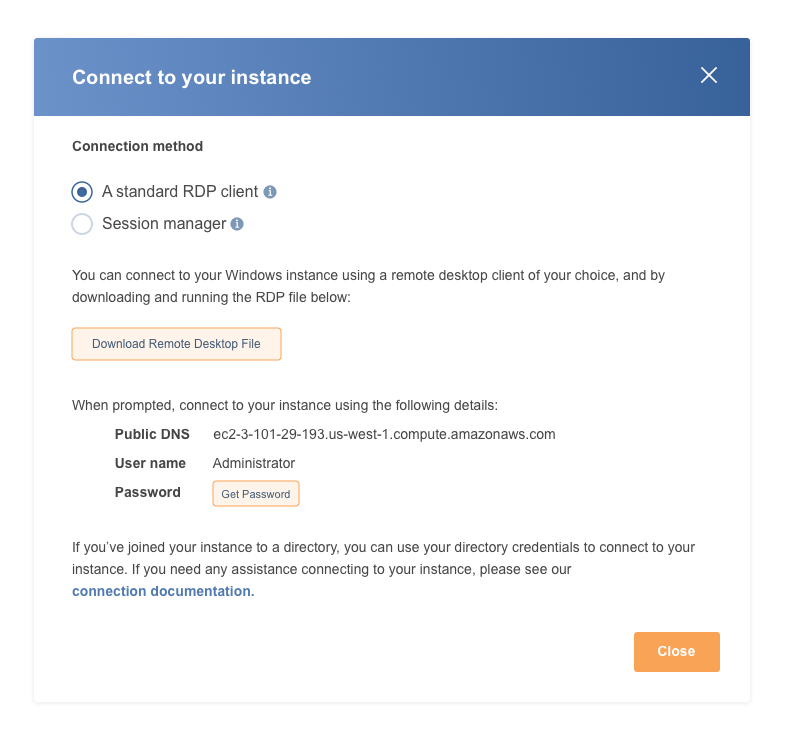
Connect to your instance over RDP
With your instance create and ports opened, you should be able to find your EC2 Instance and connect.

Now, you can download the RDP connection file and retrieve the password by uploading the PEM key you chose when you created the instance.
Install OpenSSH for Windows (Option 1)
If you don’t want WSL, you can install OpenSSH directly on the server. This setup has a few things to consider:
- No SSH Key Agent forwarding. The windows version of OpenSSH server does not support the forwarding of pre-shared keys from the local machine to the dev server to the downstream repository. It’s a very subtle limitation. The only indication of the problem is a line in the server logs. This can be hard to figure out considering how picky and prone to failing the OpenSSH server is regarding key security. You can, however, create and load an ssh key on the development server and configure the SSH agent to use that. We’ll be covering all of this in part 3. Now, you just need to decide if you want to be purely windows or if you want the power of Windows and WSL with a fully functional SSH Server.
- Administrator Keys are weird. Administrator users have their public keys stored in a different file that the standard authorized_keys file in the user’s ssh directory.
- Native Windows Shell. One major advantage of using the Windows version of the OpenSSH server is that it’s all Windows. Your SSH terminals will be in CMD. While this is easy to arrange in WSL, it’s out of the box functionality for the purists.
In an elevated Powershell, run:
# Make sure that OpenSSH is available for your Windows
Get-WindowsCapability -Online | ? Name -like 'OpenSSH*'
# Install the OpenSSH Client
Add-WindowsCapability -Online -Name OpenSSH.Client~~~~0.0.1.0
# Install the OpenSSH Server
Add-WindowsCapability -Online -Name OpenSSH.Server~~~~0.0.1.
# Enable OpenSSH Server to always start
Start-Service sshd
Set-Service -Name sshd -StartupType 'Automatic'
You can read about the finer points of configuring the OpenSSH Server on windows here.
Install OpenSSH for WSL Ubuntu (Option 2)
If you do all of the OpenSSH features and the power of Linux running along Windows on the server, you can WSL. This setup also has a few things to consider:
- SSH Key Agent forwarding. We still must configure it, but it’s supported.
- WSL needs to be run as a user. There’s no way to run WSL Linux services directly. Some scripts or a Scheduled Task configured to run as a Windows user at boot are required.
- You’ll need to create users in Ubuntu as well as windows. SSH requires users to connect to on the development server. Windows OpenSSH server can just use Windows users, but you will need to create users inside Ubuntu for them to connect.
- All windows files are available under
/mnt/{drive letter} - You can write from Linux to Windows, but not the other way around.
- You can run a mix of windows and bash commands, but Powershell takes precedence.
- Windows executables require the full name including the extension.
- If you start a WSL session from the desktop, you get access to the windows path variables. When you SSH in, you don’t unless you expressly set them up.
- The WSL application is specific to that user. Fortunately, it can be exported and shared with other users.
In an elevated Powershell, run:
dism.exe /online /enable-feature /featurename:Microsoft-Windows-Subsystem-Linux /all /norestart
dism.exe /online /enable-feature /featurename:VirtualMachinePlatform /all /norestart
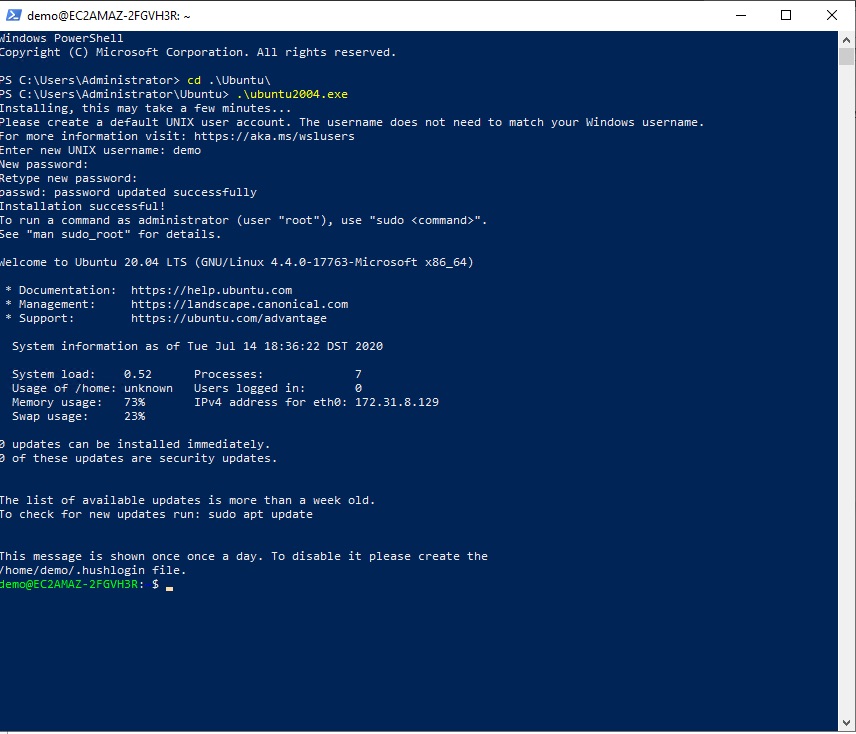
wsl --set-default-version 2Now, you can install the Linux distribution of your choice. You can install multiple flavors at the same time too. This guide will be using Ubuntu 20.04. The official Microsoft guide is here. Downloading and installing will take a few minutes.
In an elevated Powershell, run:
Invoke-WebRequest -Uri https://aka.ms/wslubuntu2004 -OutFile Ubuntu.appx -UseBasicParsing
Rename-Item .\Ubuntu.appx .\Ubuntu.zip
Expand-Archive .\Ubuntu.zip .\Ubuntu
cd Ubuntu
ubuntu2004.exe
$userenv = [System.Environment]::GetEnvironmentVariable("Path", "User")
# Make sure this concatenated path matches the ubuntu2004.exe location
 [System.Environment]::SetEnvironmentVariable("PATH", $userenv + ";C:\Users\Administrator\Ubuntu", "User")
This will download and extract Ubuntu2004 as a exe in the administrator’s home directory. When you run it for the first time, you will configure a user and password. It will also become the default distribution when you run wsl.exe. We’ll be creating and using a user called demo with a password demo.
Install OpenSSH Server in WSL Ubuntu
Log into wsl as the user you created.
ubuntu2004.exe
# Inside Ubuntu Shell
sudo apt install ssh
[sudo] password for demo: {the password you created}
sudo ssh-keygen -A # Generate the ssh keys for the server
sudo service ssh start
Run OpenSSH Server in WSL Ubuntu when Windows starts
One downside of this setup is that there is no way to run WSL as a service. We’ll need to configure Windows to login and start WSL as a user via a Scheduled Task.
First, we need to allow the OpenSSH Server to start without authentication inside WSL Ubuntu
Log into wsl as the user you created.
# Enable starting sshd without password
sudo visudo
[sudo] password for demo: {the password you entered}
#Add this line below %sudo ALL=(ALL:ALL) ALL
%sudo ALL=NOPASSWD: /etc/init.d/ssh
# Exit and save
On the development server, open Windows Task Scheduler and add our command as a startup task.
Click on Create Basic Task
Name it Start WSL sshd
Move to Next > Trigger
Select When the Computer Starts
Move to Next > Action
Select Start a program
Move to Next > Program.script
Enter C:\Windows\System32\wsl.exe
Add arguments (optional): -u demo sh -c “sudo /etc/init.d/ssh start”
Run the task and refresh it. You want it returning 0x0 as a status code.

Select the task that just got created and enable it to always run. You will need to enter the credentials of the windows user, else it just won’t run.
Restart the server. The SSH server should be listening by default and you can move on to getting SSH access.
Allow OpenSSH Server traffic through Windows Firewall
The AWS Security group with the traffic for 22 takes care of our AWS firewall access, but Windows Server 2019 will block the traffic by default.
Whether you installed OpenSSH Servber via Windows or WSL Ubuntu, you need to allow traffic on port 22.
Add a Windows Firewall Rule to allow SSH by running these commands in an elevated Powershell. Note, this will open up 22 for all TCP traffic at the Windows Firewall level.
In an elevated Powershell, run:
Set-NetFirewallProfile -All -Enabled True
New-NetFirewallRule -DisplayName 'WSL SSH Inbound' -Direction Inbound -Action Allow -Protocol TCP -LocalPort @('22')
Let’s Get Connected
You should now be able to open an ssh connection to the server. You will not be able to login by default because we must setup our authentication. By default, OpenSSH Server ships with password-based login disabled because it’s insecure. You’ll need to configure an SSH client on your local machine. On mac and linux, you should be able to open up terminal and have ssh dump its command line arguments.
Windows users, you must have an ssh client installed. If you’re running Windows 2019 or Windows 10, you can install the windows client version. While you can use Putty for now, the SSH keys pageant generates need to be converted to work with OpenSSH Serbver.
You can install the OpenSSH client for Windows on your local machine by opening an elevated powershell and running:# Make sure that OpenSSH is available for
Get-WindowsCapability -Online | ? Name -like 'OpenSSH*'
# Install the OpenSSH Client
Add-WindowsCapability -Online -Name OpenSSH.Client~~~~0.0.1.0
Configuring SSH keys will be covered in Part Two. For now, let’s try it with our username and password before we go locking things down. Preshared keys are finicky and will fail unless they are in the right place with the right permissions. By validating with a username and password first, we can make sure everything else works.
Configure OpenSSH Server for Windows
The first thing we need to do for Windows is copy the default config file to the run time location.
In an elevated Powershell, run:cp C:\Windows\System32\OpenSSH\sshd_config_default 'C:\ProgramData\ssh\sshd_config'
Edit C:\ProgramData\ssh\sshd_config in your favorite text editor.
While we are in there, let’s turn on PublicKey Authentication for later by uncommenting and changing this line to yes.
PubkeyAuthentication yes
And for temporary testing purposes, enable password based authentication by uncommenting and changing this line to yes.
PasswordAuthentication yes
Restart the OpenSSH Server. You should be able to login to your box using your RDP credentials.
On your local machine, run ssh -vvv administrator@{your ec2 dns name or ip address}
And login with the same password retrieved via the pem key. The -vvv flag puts the Open SSH Client on your local machine into verbose mode and shows all the authentication steps it is trying. That kind of verbosity will aid you in troubleshooting connections and understanding what SSH is trying to do.
You should now be sitting at a remote terminal and can interact with CMD.
When you’re satisfied, be sure to set PasswordAuthentication to no in the copied C:\ProgramData\ssh\sshd_config.
Restart your server and get ready to configure some OpenSSH keys.
Configure OpenSSH Server for WSL Ubuntu
Login to WSL on the Development Server as demo.
wsl -u demo
In the WSL shell:
edit /etc/ssh/sshd_config
While we are in there, let’s turn on PublicKey Authentication for later by uncommenting and changing this line to yes.
PubkeyAuthentication yes
And for temporary testing purposes, enable password based authentication by uncommenting and changing this line to yes.
PasswordAuthentication yes
Find and uncomment the line that allows Agent Forwarding
AllowAgentForwarding yes
Exit and save your changes then restart the OpenSSH Server with sudo service ssh restart
On your local machine, run ssh -vvv demo@{your ec2 dns name or ip address}
And login with the same password you created in WSL. The -vvv flag puts the Open SSH Client on your local machine into verbose mode and shows all the authentication steps it is trying. That kind of verbosity will aid you in troubleshooting connections and understanding what SSH is trying to do.
You should now be sitting at a remote terminal and can interact with Bash. While you are in Ubuntu, you can access your windows environment at /mnt/c.
That’s it! You should be SSHing into your box which the main thing required to setup remote code. Before we get to the really good stuff, Part two will talk about tweaking your installation to enable Public Key Authentication and other goodies. Part three will go over Visual Studio Code remote development and draw back the curtain on the power of this setup.
Brian Hatchet is a Senior BI Consultant at DesignMind.